Building a Text to Image Web App
An ML-researcher stumbles into full-stack development.

This blog post details how I built a web-app that generates images from text prompts. The images are generated using the CLIP+GAN method, but this post focuses not on how to generate the images but on describing the software stack and technologies used to create an interactive website and serve the model to the public. In short, the web app consists of three main components: The frontend written in Vue, a CPU backend running FastAPI and a GPU-Cluster-Backend managed with Ray.
Update from 2025: This project was completed before any text-conditional image models were publicly available. Both image generation and model serving technology has advanced a lot since, but I will keep this post online as an artifact of the time. To my knowledge, in the brief period where it was online in March 2021, it was the only other text-to-image website next to DALL-E, while all other image generation was happening in Google Colabs. It was also done before serverless GPUs became available.
Introduction
This journey began in early 2021 when, like many people, I was amazed by the diversity and quality of images being generated by OpenAI’s Dall-E. Also, like many people, I was soon saddened to find out that it is not publically available. So I forgot all about it again.
Part of the release by OpenAI was a model called CLIP that - on a high level - allows us to calculate a similarity score between an image and a text description. A few days later, Advadnoun tweeted out a method, later titled “Big Sleep” that used the CLIP model to search a generative model’s latent space - Big-GAN to be precise - for an image that fits a given text prompt as well as possible. However, the sample quality wasn’t quite there yet. I hypothesized that this might be due to Big-GAN’s latent space being too complicated, as the model was trained to generate anything in ImageNet, from people, to animals, to buildings, to cars. So I wanted to try a model that covers a less diverse training dataset. In the other extreme, using a model trained e.g. only on faces seemed not diverse enough, too boring, and there weren’t many high-quality image models publicly available.
That’s when I stumbled upon Aydao’s anime image model . Being publicly available, capable of generating diverse, but not too diverse, relatively high-quality images it seemed perfect! I modified Big-Sleep’s public code to use the Anime-GAN, ported it to PyTorch and made a few changes to Advanoun’s search algorithm to boost the sample quality and improve also the generation speed. After a while, I was happy with the results and excitedly wanted to share this model with the world.
However, this is where difficulties started. To work on the image generation approach, I was renting vast.ai RTX3090 instances at 0.35 USD/hr. Even on these beefy machines, the model took 40 seconds to generate a single image and required a ton of GPU memory to do so, so simply sharing the code and using a consumer graphics card wouldn’t work. But led by a wish to share this with the world (and a missguided hope that this could become profitable) I switched from ML graduate student to wannabe full-stack web developer.
Project structure
To run a website, you typically need two things: a backend and a frontend. For a machine-learning service, it makes sense to separate the backend into an ML-backend, running on GPU servers and only responsible for running the models, and a webserver-backend that can run on a cheap CPU server and only handles serving the results and the frontend. This has the big advantage that expensive GPU servers can be shut down when not in use, while the website stays operational, running on a cheap CPU server. For ease of deployment, I ended up hosting everything on AWS.
ML-Backend/ Model Serving
Coming from the ML side, model serving is naturally where I felt the most comfortable and thus this is where I started.
Wanting to build a project with the potential to handle a large amount of concurrent requests, I first searched for a serverless GPU-solution. Unfortunately, such a solution didn’t exist at the time, so I planned to use the next best thing: Auto-scaling GPU-instances. Fortunately, I’m not the first person to face this challenge and there is a comfortable framework that can be used: Ray, specifically their Ray Serve project. With a bit of refactoring of my code, it was easy to set up an API that takes requests with a prompt and generation parameters and returns (after about 30 seconds) the resulting image as a base64 string. Given a compatibly structured project, Ray enables the setup of a cluster in just a few lines of Code:
1
2
3
4
5
6
7
8
9
10
11
12
 import ray
from ray import serve
from ServeCLIPGan import CLIPGanBackend, UpscaleBackend

# Connect to the running Ray Serve instance.
ray.init(address='auto', ignore_reinit_error=True)
client = serve.start()

# Deploy the endpoint.
 client.create_backend('clipgan_backend', CLIPGanBackend,
     config={'num_replicas': 2}, ray_actor_options={"num_gpus": 1})
 client.create_endpoint('clipgan_class', backend='clipgan_backend', route='/clipgan')
And just like that, we can now send requests to the endpoint /payload with the desired text prompt and receive an image as return.
However, this endpoint doesn’t verify where requests are coming from, can’t prevent spam or enforce rate limits per user, so for security’s sake the generator server is configured to only accept requests from the webserver-backend.
Webserver-Backend
The webserver-backend is responsible for handling image generation requests from users, filtering those requests as well as managing user accounts and rate limits. To implement it I decided to use FastAPI. I didn’t put too much thought into selecting a framework here, but it is well documented and was very easy to get into for a web development novice. The syntax is quite nice as well, defining endpoints is easy with decorators and FastAPI comes with user management libraries directly built into it.
1
2
3
4
5
 @router.get("/random_image")
def random_image(request: Request):
    img_b64, title = get_debug_b64_image('', 0, 0)
    print(request.client.host)
    return {'image': b'data:image/png;base64,' + img_b64, 'title': title}
Frontend

For the frontend I first made a quick mockup using Streamlit. Streamlit allows you to write an entire frontend all in python and in a single file with an incredibly simple syntax:
1
2
3
4
5
6
7
8
9
10
11
12
13
14
15
16
17
18
19
20
21
22
23
24
25
26
27
28
29
     import streamlit as st

    def main():
        st.set_page_config('AI-Commision')
        st.title("AI Commision")
        """We can generate images, very machine learning, much AI, wow."""

        prompt = st.text_input('Describe your desired drawing or image.',
                        value='Default: An anime-style image of a girl with blue hair.')
        psi = st.slider('Creativity', min_value=0.3, max_value=1.3, value=0.7, step=0.1, format='%f')
        num_it = st.slider('Iterations', min_value=1, max_value=15, value=1, step=1, format='%i')
        """
        A higher creativity leads to more diverse but potentially less realistic images.
        A higher number of iterations takes longer but might be necessary to match the prompt.
        Using the defaults of creativity=0.7 and iterations=10 should be fine for most cases.
        """
        upscale = st.checkbox('Upscale', value=False)
        st.button('Retry!')
        # Generate a new image from this feature vector (or retrieve it from the cache).
        with st.spinner(text='Processing, expect a {} second wait, plus 10s if upscaling...'
        .format((num_it + 1) * SECONDS_PER_IT)):
            image_out, file_name = get_image(prompt, psi, num_it, upscale)
        st.image(image_out, use_column_width=True, caption=file_name)

    @st.cache
    def get_image_from_backend(prompt, psi, num_it):
        payload = {'prompt': prompt, 'psi':psi, 'num_it': num_it}
        image_b64 = requests.get(BACKEND_SERVE_ADDRESS + '/clipgan', json=payload).text
        return image_b64
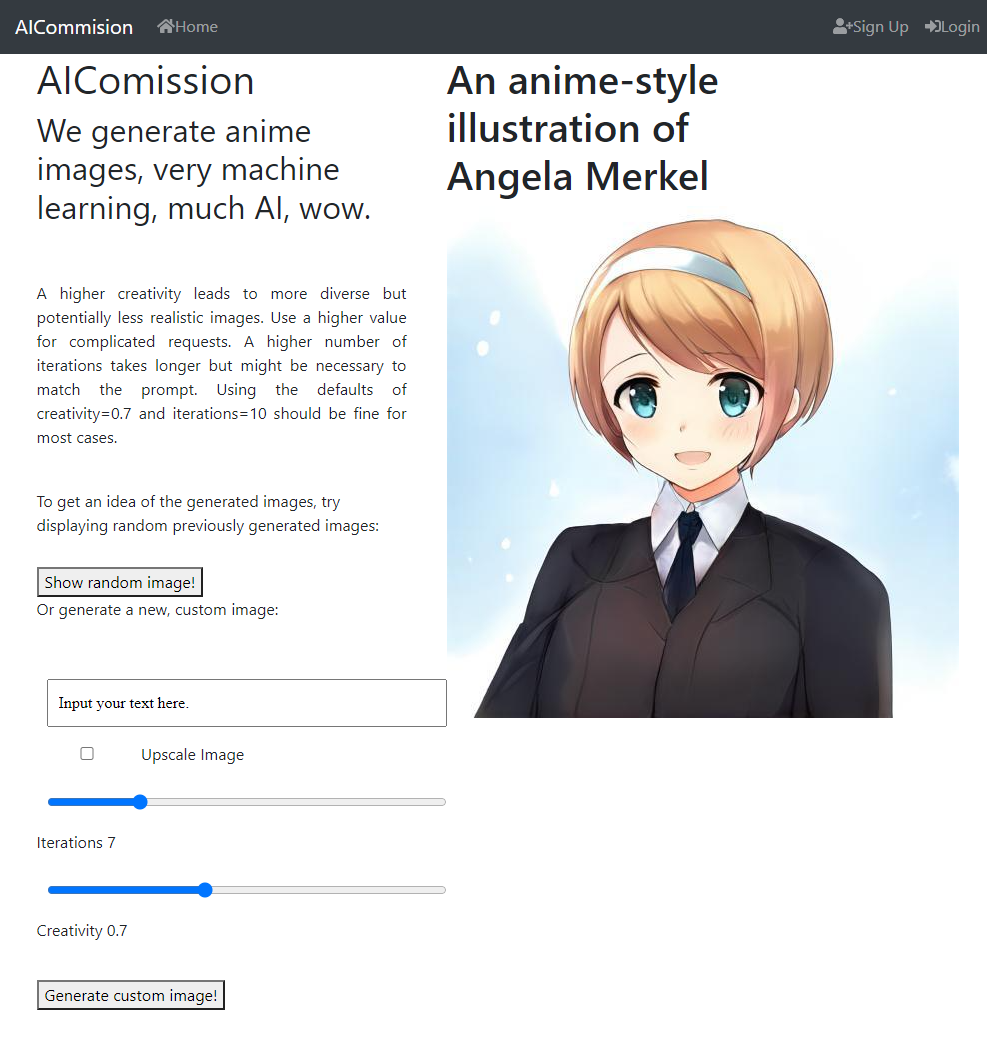
It uses the comments to define text fields and adding inputs is as easy as single line. Deploying it is as simple as calling streamlit run app.py and opening the port to the web (probably not very safe, but I only used it to test the idea with a few friends). However, while streamlit is great for a mockup, I quickly encountered it’s limitations when wanting to add authentification and limit the requests per person. Also, streamlit is stateless, so upon refreshing the webpage streamlit forgets all about previous requests which might nontheless still be processing on my backend. This is okay for a model that is finished in part of a second, but not okay for a model that takes the better part of a minute to run.[^1]
Vue Frontend
To overcome Streamlit’s limitations, I decided to properly build a frontend from scratch. The framework I decided to use after some research was Vue. As with FastAPI, I can’t really say whether it’s the perfect choice, but I can vouch for their tutorials being great for a complete beginner.
Vue’s declarative rendering provides an intuitive API, because it allows you to easily add if-else conditions right in the HTML code. As an example let’s look at the following snippet, in which we define part of the GenerationRequest “component”.
1
2
3
4
5
6
7
8
9
     <li>
        <h1></h1>
        <div v-if="finished_generation">
            <img :src="image" />
        </div>
        <div v-else class="alert alert-primary" role="alert">
                Image is being created, expected wait:  s.
        </div>
    </li>
If finished_generation=true, we display the resulting image. Else, we display an dialog that shows the remaining wait time. In the javascript section we just have to describe the logic to send an image request to our fastapi-backend and to handle the response:
1
2
3
4
5
6
7
8
9
10
11
12
13
     axios
        .get("BACKEND_IP/api/generate_image_protected", {
            params: {
                prompt: this.prompt,
            },
            headers: {
                Authorization: "Bearer " + this.$store.state.auth.user.access_token,
            },
        })
        .then((response) => {
            this.image = response.data.image;
            this.finished_generation = true;
        })
Vue allows the programmer to nicely bundle HTML, JS and CSS code together in a single component, which can then be inserted into a different component or “view”. For example, in the main view, pressing the “request” button triggers a JS callback that adds a new request to the list of requests. In the HTML we can then simply declare that we would like a column with a GenerationRequest component for every entry in the list of requested images:
1
2
3
4
5
6
7
8
     <div class="col-lg-5">
        <ul
            is="GenerationRequest"
            v-for="req in requested_images"
            v-bind:key="req.key"
            v-bind:prompt="req.prompt"
        ></ul>
    </div>
The visual part of the frontend I built is really just a few bootstrap components stuck together, which are great because they automatically adjust to the window size, which makes the website work on mobile without any changes! However, there are certainly many visual aspects of the website that should still be improved, if I ever plan to go beyond this prototype.
Lessons Learned
Post-Mortem: Why did the project eventually fail to become financially viable:
- Narrow focus: I focused on anime-images, because they were the highest quality kinds of text-to-image models out there at the time. In retrospect, I probably should have bet on the publically available text-to-image models improving over the next few months, which they certainly did.
- AWS startuptimes and GPU-costs. Spinnning up a new GPU instance took at least three minutes from request to the image generation starting. That means I would have had to permanently keep at least one GPU-instance running, which wasn’t financially viable. Serverless GPU compute would have been the solution, but that wasn’t available at the time, and still isn’t really readily available.
Also half-way through the project I started working full-time, which significantly affected my available free time.
Conclusion
This project has been a great change of pace from research and has been a lot of fun. While I am of course far from being an effective fullstack-developer, it is amazing how quickly one can develop a web app with today’s technology. I have learned a lot about model serving, cloud technologies and front- and back-end development. Such websites are a great way to share your research with friends, and seeing their requests roll in to my server during a beta-phase made me very happy.
Unfortunately, I couldn’t manage to reduce the cost sufficiently to consider keeping the website as an advertisement-financed free tool, neither do I believe that in it’s current stage it could be commercially viable, especially with competition from “free” colab notebooks, so I ended up having to shut down the servers in the end.
But I am sure that I will use the knowledge I gained again in the future, maybe in some other project!
Footnotes:
[^1] Upon searching again, it seems like Streamlit has now added simple authentification and statefullness, but eventually, as the project becomes more complex, there’ll be a time to move on.
PS: Things that did not work
Here I’ll briefly list what I didn’t get to work, if any reader plans to do a similar project in the future.
- Instance spin-up
- Instance spin-up was crucial in this project, as each image takes 40 seconds of GPU time to generate. At 25ct/hour (or 180$/month) I couldn’t afford to have GPU instances idling around, so my plan was to start up a new instance for each image request and shut it down again after a few minutes of idle time. I therefore tried my best to get AWS instances to start quickly. Whatever I tried, I could not get the time from request to image-generation start under three minutes. Interestingly, the instance would be available after maybe 20 seconds, but the first call to
import torchper instance would take at least 2 minutes. I tried to avoid this by creating my own container image, using amazon’s provided container image, using docker in an amazon provided container, zipping the torch files into a single file unzipping after the instance started, … Nothing really changed the result by more than a few seconds. AWS offers an option to have a container cached closer to the EC2 instances, but at 500$ a month this was not an option either.
- Instance spin-up was crucial in this project, as each image takes 40 seconds of GPU time to generate. At 25ct/hour (or 180$/month) I couldn’t afford to have GPU instances idling around, so my plan was to start up a new instance for each image request and shut it down again after a few minutes of idle time. I therefore tried my best to get AWS instances to start quickly. Whatever I tried, I could not get the time from request to image-generation start under three minutes. Interestingly, the instance would be available after maybe 20 seconds, but the first call to
- ONNX
- ONNX is a framework-independent representation of neural networks, which promises easier deployment and faster inference
- I spent two days trying to convert the combination of CLIP and the GAN to ONNX but eventually gave up. However, apparently now Lednik7 managed to get CLIP to work in ONNX with a 3x speed-up!